
With so many different materials and several specified scales to measure them with, it’s easy to see how ensuring a proper moisture meter reading can be a bit of a challenge. Even if you’re sure you have the right scale for your designated material, you still may have to make adjustments based on various factors.
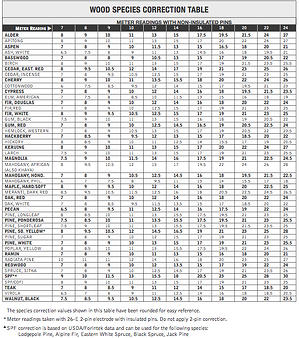
Take measuring the moisture in wood, for instance. As the basic wood scale is calibrated to Douglas fir, not all construction-grade lumber will necessarily provide the same readings, even. Due to differing electrical properties of different wood species, obtaining a precise reading may require a conversion using a species correction table or a moisture meter that features built-in species corrections.
To help you make the most informed decisions, we’ve compiled a short list of tips that will guide you to making correct meter interpretations.
Don’t Assume
When you’ve completed your moisture content reading, it’s always suggested to double-check your results. In all reality, your reading is only as precise as the meter you’ve chosen. It’s also advised that you take into account the external factors that may affect your reading such as material temperature and the depth of the moisture.
Select the Appropriate Scale
As most moisture meters are calibrated for wood, you’ll have to take extra measures to ensure a proper reading if you’re using the meter to measure a material other than wood. When measuring non-wood materials, we suggest the use of a reference scale or a meter specifically calibrated for the material you are testing.
Depending on the type of wood, you may have to refer to a species correction chart, like the one shown here, to convert your meter reading to the actual %MC based on that species. Or, if you have a meter with built-in species corrections, just set the meter to the species you are testing.
Adjust Your Readings for Temperature
A common point that’s overlooked when checking moisture content is the temperature of the actual material. Now, this doesn’t mean that it’s impossible to gain an accurate reading in hotter or colder temperatures, but it does mean that you’ll have to use a table to convert the reading into an accurate measurement, or use a moisture meter with a built-in temperature correction feature. If you're unsure of the temperature of the wood, use an infra-red thermometer to check the surface temperature of the wood, and use that number when making your adjustments.
As a rule of thumb, temperatures below 50°F or above 90°F should prompt you to also measure the temperature of the wood to see if you’ll need to convert your reading. It's generally not necessary to make a correction for temperature if the wood that falls within the 50°F-90°F range.
Correctly Apply the Reference Scale
For materials like brick and concrete block, it’s imperative that you understand what the meter’s readings mean and don’t mean. The reference scale will only indicate high or low moisture content, and will not provide actual %MC.
Still, a moisture meter with a reference scale is very useful because it allows you to compare readings on a material that is known to be dry to another piece of the same material that may have excess moisture levels.
Take Moisture Readings Quickly
Timing is another factor that you must take into account. After a few seconds, some meters’ readings may drift downwards. For the best results, make sure that you jot down your readings within 2-3 seconds.
We hope you take these tips to heart when performing your next moisture content reading. Adjusting the meter to the right setting and making the necessary adaptations post-measurement will ensure you and your customers get the right readings to protect them from moisture-related errors and oversights.
Comments